Choose the Best Garage Door for your home (Complete Guide)

Choose the Best Garage Door for your home (Complete Guide)

A garage door can be a constant point of frustration for homeowners. From installation to maintenance, there is a lot to consider. If you are planning to install a new garage door then you need to be prepared for what you are about to experience. In this blog, we are taking you through the different things you need to consider before buying a new garage door and getting you one that will last for years to come.

Garage Door Styles

The first thing you have to know is the most common style types of garage doors. if you are looking for a residential garage door you surely heard about the Carriage garage door.

Carriage garage door

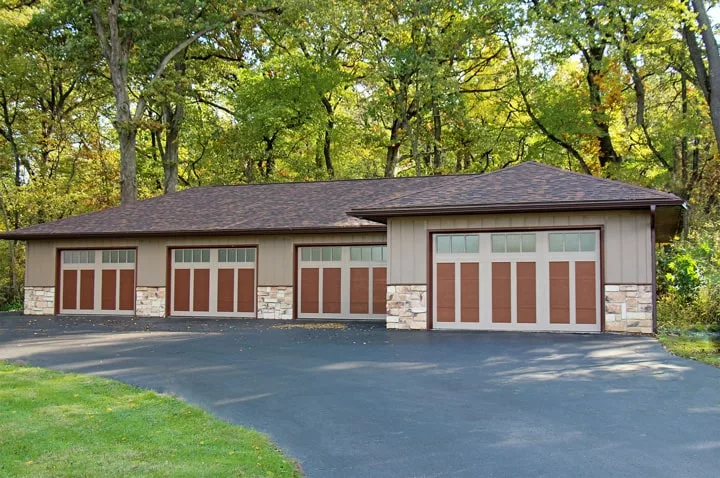
Raynor RockCreeke Carriage House Garage door

Raynor RockCreeke Carriage House Garage door

Carriage garage doors are the ones that look like they belong in a carriage house. They have a classic, old-fashioned look to them that can add charm and curb appeal to your home. They come in a variety of styles and can be made from wood, steel, or fiberglass but mainly wood.

Carriage garage door pros & cons

There are a few things to consider when deciding if a carriage garage door is a right choice for your home.

  1. Carriage garage doors have a unique look that can add curb appeal to your home. However, they may not be the best choice if you’re trying to achieve a certain style for your home like modern-style homes for example.
  2. Carriage garage doors can be more expensive than other garage doors, in fact, they are the most expensive residential garage door so if you’re on a budget, you may want to consider another option.

Sectional garage door

Modern steel garage door

The sectional garage door is one of the most popular in the U.S. Sectional garage doors are a great option for homeowners in terms of Reliability & Cost.

There are many advantages & disadvantages to using a sectional garage door.

Advantages

  1. If you considering getting a sectional garage door you should be thinking about its biggest feature which is no doors opening mechanism which is rising and lowering panels that work in vertical tracks that curves at the top of your garage roofline. This ability to have multiple panels saves a lot of space in your garage door storage and else provides a high level of security.
  2. The sectional garage door is cost-effective: one of the reasons that homeowners use sectional garage doors is it’s the most economical option available.

Disadvantages

  1. One of the downsides of sectional garage doors is that they need high maintenance due to their high mechanical parts.
  2. Installation can be complicated if you’re not experienced in this type of work. you may need a professional because once your garage door is installed by a professional you are unlikely to run into problems in the future. You can Call our professionals to learn more about Installing a new garage door.

Choose The Right Garage Door Opener

After you know the most common garage door types now it’s a good time to know What are the Different Types of Garage Door Openers and else know the technologies it holds. this kind of information is the most important part because it will make your life way easier and provide you with safety and security which is the most important aspect for every homeowner.

Chain Garage Door Openers

Chain Drive Garage door Openers

Chain garage door openers are a type of garage door opener mechanism that uses a metal chain to raise and lower the garage door. These openers are known for their affordability and durability. While they can be a bit noisy compared to other types, they are a popular choice for homeowners seeking a cost-effective and robust garage door opening hours power for heavier garage doors.

Belt Garage Door Openers

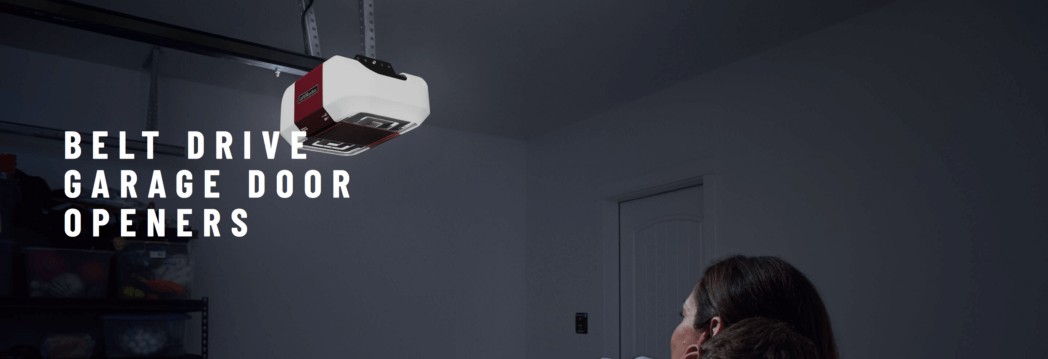
Belt Drive Garage openers

Belt garage door openers utilize a rubber or synthetic belt instead of a chain for the door’s operation. They are favored for their quieter operation compared to chain openers. While generally pricier, belt openers are preferred by homeowners seeking a smooth and silent garage door opening experience. They are known for their reliability and are a popular choice for those who prioritize reduced noise levels in their garage door system.

You may want to read our blogpost comparing Chain Opener Vs Belt Openers

What is the best opener type for Sectional Garage Doors?

The most common types of sectional garage door openers are belt-driven and chain-driven openers. Belt-driven sectional garage door openers use a belt instead of a chain to move the trolley that opens the door. The belt is usually rubber or polyurethane.


wled belt opener

WLED belt opener

LiftMaster belt drive garage door openers, are ultra-strong and virtually silent, making them ideal for homes with attached garages.

Best Models
WLED ||| 8550w

Chain-driven sectional garage door openers use a chain to drive the trolley that opens the door.
Reliable and powerful, LiftMaster chain drive garage door openers are built to handle heavy and frequently used doors with ease, day in and day out.
8360W Miami garage door opener

Best Models
8587w ||| 8360w

Chain garage door openers Vs Belt Garage door openers

Chain garage door openers require less maintenance than Belt openers but if you compared the chain version and the belt version in terms of sound noise you will find that the belt-driven garage door opener has a tremendous difference in noise reduction more than the chain version.

How to Choose the Best Garage Door for Your Home

Choosing a garage door can be a daunting task, but it doesn’t have to be. The following steps will help you make the best decision for your home.

The first step is to consider what type of garage door you want. as we mention earlier the most common garage door types are Carriage & Sectional Garage doors. these bullet points will help you as a checklist to decide which type is right for your home

Garage door design

Selecting the right type for garage door requires you to design your own garage door always use Manufacturers’ Websites to choose a Door design

Materials

Decide what materials you want your new garage door made out of. Garage doors come in many different materials including steel, aluminum, and wood.

Steel & aluminum

There are a few things to consider when choosing between a steel or aluminum garage door. Steel doors are more durable and require less maintenance, but they are also more expensive. Aluminum doors are less expensive but not as durable and will require more maintenance.

Wood

There are a few things to consider when thinking about getting a wood garage door:
The first is the cost. Wood doors can be expensive, especially if you want a high-quality door.
The second is maintenance. Wood doors require more care than other types of doors, such as steel doors. You will need to regularly paint or stain the door to protect it from the elements.
The third is appearance. Wood doors can give your home a more traditional look which is something perfect for classic and Carriage homes.

Which is the Garage Door material best option for you?

If you are looking for a durable door that will not require much maintenance, then a steel door is the way to go.

If you are looking for a less expensive option that will require more maintenance, then an aluminum door is the best option.

if you mainly look for something looks perfectly good and fits with your Carriage home then wood is a plus.

Isulated or Non Isulated

Insulating the garage door is a very important factor in determining the budget that your garage door will cost, so you must choose well if you want it to be insulated and know the advantages of these layers of insulation In a short and useful way, Insulated your garage door will have a great impact on maintaining the temperatures of your home and thus save you the electricity bill. In addition, it is a very good factor for protection from theft and burglary, and thus puts your house in its best image, and many Collections of insulated garage doors can suit your budget, there are also garage doors that come with layers of insulation.

Safety

There are many different garage door opener safety options available on the market today. Some of the most popular options include sensors that will automatically reverse the door if something is in the way for people that have kids, and timer-based systems that will automatically close the door after a certain amount of time has passed. There are also remote control systems that allow you to open and close the door from a distance, and keypad entry systems that require a code to be entered to open the door.
No matter what your particular needs are, there is likely a garage door opener safety option that will suit your needs all you have to do if look for the options that you really need and find the right opener for your needs.

Budget

Finally, you will need to decide on a budget. Garage doors can vary significantly in price, so it is important to set a budget before beginning your search. By keeping these factors in mind, you will be able to find the perfect garage door for your home.

If you’re thinking about upgrading your garage door, you’ll need to think about the cost of the new door as well as the cost of installation. Depending on the size and style of the door, budget for anywhere from $500 to $2000 for the door itself. Installation costs will vary depending on the door and the complexity of the installation, but budget for at least $200 for installation.

Tips for your new garage door

Now you have reached the point where you somehow choose your garage door idea and maybe we are the ones who will be doing it for you. but what about extra tips to maintain your garage door and keep it always in good condition just like new? We did a topic about how to maintain your garage door, I recommend you to read it besides these 5 more tips.

1. Regularly clean your garage door with a mild soap and water solution.

2. Inspect your garage door regularly for any signs of wear and tear, and make sure to repair or replace any damaged parts as soon as possible.

3. Apply a fresh coat of paint to your garage door every few years to keep it looking its best.

4. If your garage door has windows, make sure to clean them regularly as well to keep them looking clear and bright.

5. Lastly, always make sure to keep your garage door opener in good working condition so that your door always operates smoothly.


Resident of Miami-Dade Or Broward County, Get a free estimate now at 305-702-0113.

Full Service garage doors, gates & openers shop

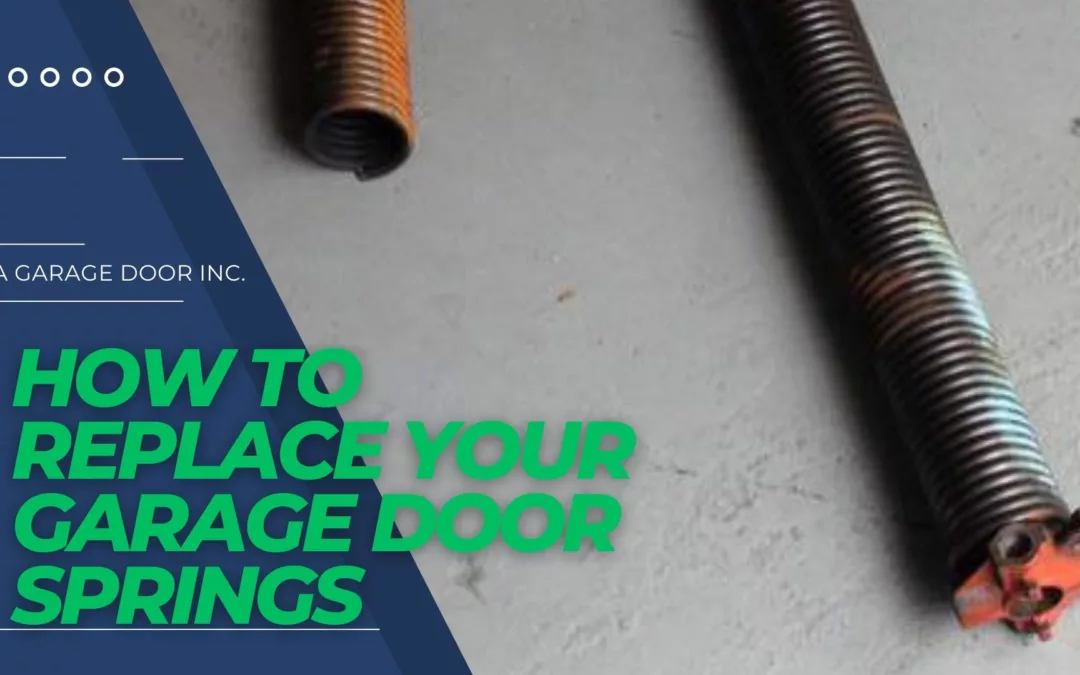
How to replace garage door springs

How to replace garage door springs

An old garage door spring can be a nuisance, especially if broken. It can affect the quality of your garage door’s movement and make your garage door difficult to open and close or really dangerous because If a spring breaks, the garage door can crash down.

Revamp your garage door with ease! Follow our expert guide to replace garage door springs whether it’s an extension or torsion springs

Signs Of A Broken Garage Door Spring

Several signs indicate your garage door spring may be broken.

1- If your door is suddenly very heavy or difficult to open, this may be a sign that the springs are damaged.

2- If the door opens or closes unevenly, or seems to be off-balance, this is another potential sign of spring damage.

3- If you hear a loud noise whenever you open or close the door, this may be caused by a broken spring.

4- If your door is no longer able to open or close completely, this is a definite sign that one or more of your springs are broken and need to be replaced.

5- If your extension springs coils are extended and irregular.
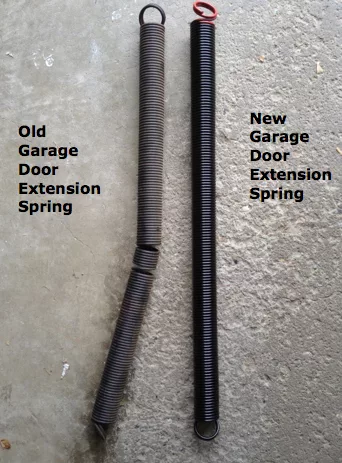
New Vs Worn out extension springs

New Vs Worn out extension springs

Let me be honest with you if you do not have the expertise to deal with these problems or even notice either of these signs, it’s important to call a professional to fix the problem. Ignoring it could result in further damage to your garage door or even injury if it breaks because springs are under tremendous tension.

if you detected one of these signs that we mentioned above you must start thinking about replacing your garage door spring because ignoring the issue will make everything more complicated and potentially harmful to you or your property. So these steps are mandentory for you on how to do it by yourself.


1- Know the strengths of your garage door spring

Garage door torsion & extension springs come in a variety of strengths and picking the right one depends on the weight of your door, the old spring diameter, the inside diameter & spring type.

Generally, they’re color-coded is the easiest identification to know your garage door spring strength. here you can see we have 10 springs color codes. Remember that this way of identification is not the most accurate way and you will probably have errors in your measurements of your spring strength.

As experts, we always use the 20 coils measurements method while measuring the torsion spring diameter, which is listed below in Replace Torsion Spring section step 4 point 6 or you can read our article about how to choose your garage door springs. which is important if you are planning to else buy replacement springs.

We won’t encourage you to do any replacements for your garage door springs by yourself, as we always mention that springs are not meant to be a DIY project because it could be dangerous and cause harm to your property or yourself if you do not have the proper knowledge of the dynamics of garage door systems.

4.9
4.9 out of 5 stars (based on 302 reviews)
Excellent94%
Very good3%
Average2%
Poor1%
Terrible0%

Our experts are Trained and Licensed to do the job right for you and many others. Don’t hesitate to call us for a consultation for your garage door repairs at 305-702-0113. we serving Miami-Dade & Broward Counties Since 2009. With Over 300 Reviews & 60,000 Finished Jobs.
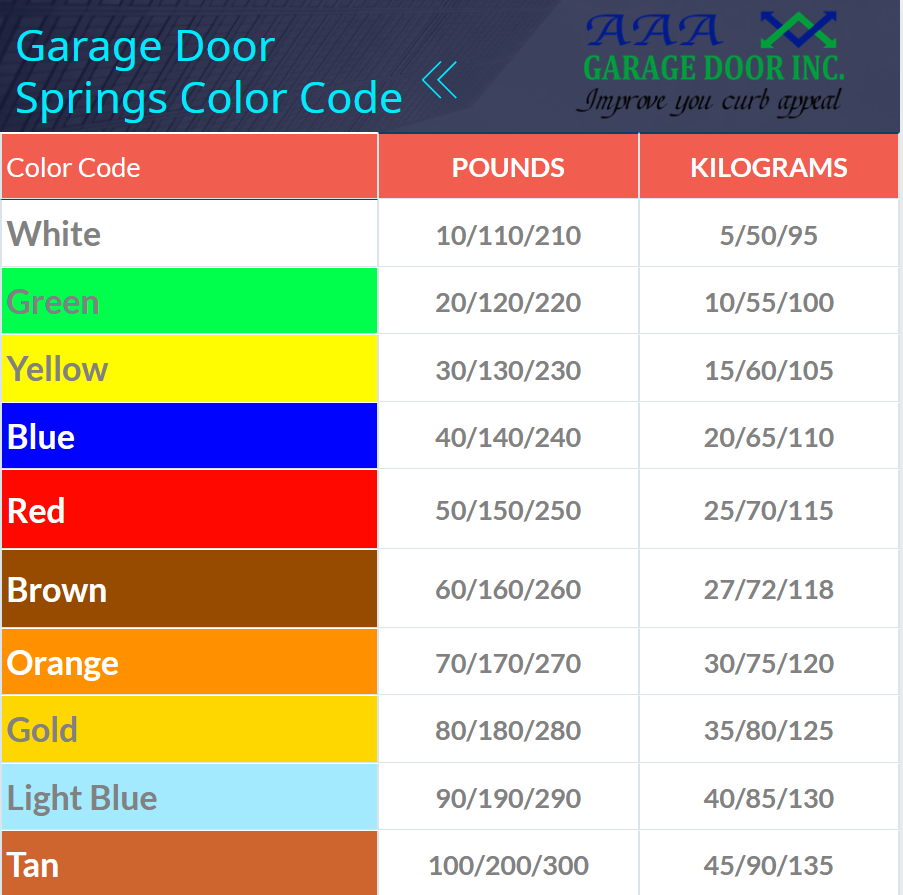
 

Garage Door spring color code

Garage Door Extension Spring Color Code

The ends of each spring are colored white for the lightest and Tan for the heaviest some other companies use blue for both their 90-pound and 140-pound Springs. If your existing Springs are blue it’s a good idea to double-check either your door weight. take a look at your existing Springs if they are color-coded make sure you replace them with Springs of the same color.


2- Know the different types of garage door springs

Knowing your garage door spring type is important to get the right replacement. There are two types of garage door springs Torsion springs and extension springs.

  • Torsion springs are located above the door.
  • Extension springs are located on either side of the door.

Both types of springs are important in the operation of your garage door. Torsion springs provide the power to open and close your garage door.

They are wound tightly and when released, unwind and provide the force needed to lift the door. Extension springs provide balance and support as the door opens and closes.

They help to counterbalance the weight of the door and keep it from slamming shut. It is important to know which type of spring your garage door is to ensure that it is repaired or replaced properly.

A qualified garage door technician will be able to determine which type of spring your door has and make the necessary repairs.

We Are providing a professional expert to handle these problems for you we are serving Miami-Dade and Broward Counties For over 14 years of expertise in all garage door services. Call Us For Consultation at 305-702-0113.

Types Of Torsion Springs

  • Standard torsion springs are most commonly found on residential garage doors – usually, only one spring is needed for effective operation on lighter doors.
  • Early-set torsion springs are similar to standard torsion springs, except that they are mounted in the middle of the torsion shaft and they are one of the safest springs because are situated inside the shaft.
  • Steel rolling-door torsion springs are more likely to be seen in commercial and industrial buildings. It’s like any other spring but These springs are contained within the torsion barrel.
  • Torque-master torsion springs are spring systems developed by Wayne Dalton garage doors they are enclosed in the torsion shaft and held in place by a winding cone at the end of each torsion rod.

Types of Extension Springs

  • Open-looped extension springs are the weakest style of extension spring and rely on one open wire at the end.
  • Double-looped extension springs are stronger than open-looped, featuring two coils at the end of the spring connect next to the pulley and eyebolt.
  • Clipped-end extension springs this kind of extension springs are the best option, they tend to last longer and are frequently used on garage doors that weigh more than 200 lbs.
[dipl_how_to_schema title=”Steps to replace garage door torsion & extension springs” howto_image=”https://aaagds.com/wp-content/uploads/2022/10/How-to-replace-your-garage-door-springs-jpg.webp” show_tools=”on” tools_title=”Tools For Replacement” tools_items=”%91{%22value%22:%22Two C Clamps%22,%22checked%22:0,%22dragID%22:-1},{%22value%22:%22Locking pliers%22,%22checked%22:0,%22dragID%22:0},{%22value%22:%22Winding bars%22,%22checked%22:0,%22dragID%22:1},{%22value%22:%22Stepladder%22,%22checked%22:0,%22dragID%22:2},{%22value%22:%22Adjustable wrench%22,%22checked%22:0,%22dragID%22:3},{%22value%22:%22Two vice grips %22,%22checked%22:0,%22dragID%22:4},{%22value%22:%22Hammer%22,%22checked%22:0,%22dragID%22:5},{%22value%22:%22Safety glasses & Leather Gloves for Safety Measures%22,%22checked%22:0,%22dragID%22:6}%93″ show_supplies=”on” supplies_title=”Supplies For Replacement” supplies_items=”%91{%22value%22:%22Torsion Springs%22,%22checked%22:0,%22dragID%22:-1},{%22value%22:%22Extenstion Springs%22,%22checked%22:0,%22dragID%22:0},{%22value%22:%22Safety Cable If Needed To Be Replaced%22,%22checked%22:0,%22dragID%22:1}%93″ show_time=”on” time_title=”Time” add_time=”3″ time_unit=”Hour” show_cost=”on” cost_title=”Cost” add_cost=”100$” _builder_version=”4.20.4″ _module_preset=”default” how_to_heading_font=”|800|||||||” tools_and_supplies_heading_text_align=”left” tools_and_supplies_heading_text_color=”#0C71C3″ global_colors_info=”{}”][dipl_how_to_schema_item step_title=”How to replace Torsion Springs” _builder_version=”4.20.4″ _module_preset=”default” step_heading_level=”h2″ step_heading_font=”|800|||||||” global_colors_info=”{}”]

Most torsion springs last for 10,000 cycles which will be 6 to 7  years for avrage home owner using a his garage door for 3 to 4 time every day so your garage door torsion spring probebly will be needed to be replaced after 6 years of installation.

[/dipl_how_to_schema_item][dipl_how_to_schema_item step_title=”Safety first: Lock down the door” _builder_version=”4.20.4″ _module_preset=”default” step_heading_level=”h3″ step_heading_font=”|800|||||||” global_colors_info=”{}”]

Before beginning any garage door parts replacement or repair, be sure to unplug the garage door opener to avoid any injuries And Keep the garage door closed while replacing torsion springs.

Find the wheel attached to your garage door that travels in the track.Then, tighten the C clamp in the track directly above the wheel.

This will prevent further accidents from happening.

Screwdrivers, pin punches, and pliers handles should never be used to wind or unwind a torsion spring.

If you’re thinking about doing this job without a proper set of winding bars, just don’t!.

Professional winding bars work with 1/2-inch. and 7/16-in. winding cones.Unplug your garage door opener before beginning this project, and be sure to keep it unplugged throughout.

Once you’ve disconnected the opener, lower your garage door and lock it into place.

This is especially important if you’re going to be replacing your garage door springs, as they can be dangerous. Wear eye protection and gloves while working on your garage door.

Once you’re ready to test the balance of your door, step off the ladder and move it out of the way. Never test a door while you’re still on the ladder – it’s dangerous.
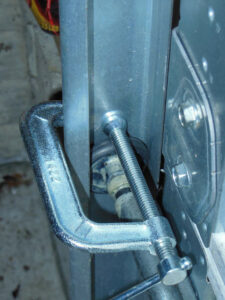
C-Clamp to lock the garage door

[/dipl_how_to_schema_item][dipl_how_to_schema_item step_title=”Use The Winding Bar” _builder_version=”4.20.4″ _module_preset=”default” step_heading_level=”h3″ step_heading_font=”|800|||||||” global_colors_info=”{}”]

In order to loosen the unbroken spring, use the winding bar.Look for the bottom hole of the winding cone of the good spring and shove the winding bar inside.Once the bar is in place, hold it while loosening the two setscrews. Be careful – when you release the setscrews, the spring will try to push with a lot of force.
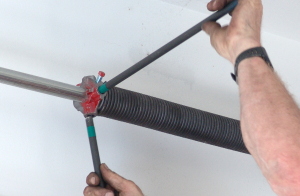
winding bar garage door spring

winding bar garage door spring

[/dipl_how_to_schema_item][dipl_how_to_schema_item step_title=”Remove the springs, cables, and cable drums” _builder_version=”4.20.4″ _module_preset=”default” step_heading_level=”h3″ step_heading_font=”|800|||||||” global_colors_info=”{}”]

To insert the second winding bar, insert it into the hole at the 9:00 position.
Remove the bottom bar and unwind the spring a quarter turn at a time. As you unwind, make sure to switch between the winding bars.

[/dipl_how_to_schema_item][dipl_how_to_schema_item step_title=”Use C-clamp to Secure the torsion tube.” _builder_version=”4.20.4″ _module_preset=”default” step_heading_level=”h3″ step_heading_font=”|800|||||||” global_colors_info=”{}”]

You will need to snap a C-clamp onto the center bracket in order to hold the torsion tube securely in place within the bracket.
Next, loosen the setscrews on both the left and right lift cable drums before disconnecting the lift cables from each drum.

[/dipl_how_to_schema_item][dipl_how_to_schema_item step_title=”Remove the springs from the bracket.” _builder_version=”4.20.4″ _module_preset=”default” step_heading_level=”h3″ step_heading_font=”|800|||||||” global_colors_info=”{}”]

first, disconnect them from the stationary spring cones. Then remove the two nuts and bolts that fasten the spring cones to the center bracket. Finally, slide the springs toward the end brackets.

[/dipl_how_to_schema_item][dipl_how_to_schema_item step_title=”Replacement Spring” _builder_version=”4.20.4″ _module_preset=”default” step_heading_level=”h3″ step_heading_font=”|800|||||||” global_colors_info=”{}”]

  1. there are a few pieces of information you have to know about the garage door spring ( The Spring wire diameter – The Inside Wire diameter – For Torsion spring Length is needed – Left or right-hand Wind Spring ).
    Calculate the wire diameter
    To calculate the wire diameter of the garage door spring, you will need to have a calculator and tape measure then use the 20 coils measurements method. For example, if you have a spring Count of 20 coils and the length of these 20 Coils is 5 inches then you can calculate the wire diameter by dividing 5 inches by 20. So in this case, the wire diameter would be 250.Another example: is if the coils measure 6.44 inches, the wire diameter would be 20/6.44 = 322. As you can see, even a small difference in coil size can make a big difference in the wire diameter. That’s why it’s important to be precise when measuring coils.A good way to confirm your wire diameter measurement is to count the number of coils and then divide it by 40. This way, you’re double-checking your work and eliminating any potential errors.The Spring color code systems we listed above can also be used to figure out wire diameter measurements, though it’s important to note that there are two different code systems in use and one of them is not very accurate anymore.
    The Inside Wire Diameter To Know the inside wire diameter you will find them written on the winding cones of the spring.
    Torsion spring Length: On your broken spring you will take the measurement of the first piece then you will measure the second one and add both measurements together to get the length of the spring.Tips: If you measure 3/4 of an inch longer or shorter it won’t make any difference to your garage door balance, but do not add the size of the winding cones of the spring that’s would make a lot more different and may result in throwing off your garage door from the track.Left or right-hand Spring: Simply look in the direction of the spring and see does the spring start clockwise or counterclockwise if it’s clockwise so it’s a right-hand spring and if it’s counterclockwise so it’s a left-hand spring.

[/dipl_how_to_schema_item][dipl_how_to_schema_item step_title=”Replace the torsion spring” _builder_version=”4.20.4″ _module_preset=”default” step_heading_level=”h3″ step_heading_font=”|800|||||||” global_colors_info=”{}”]

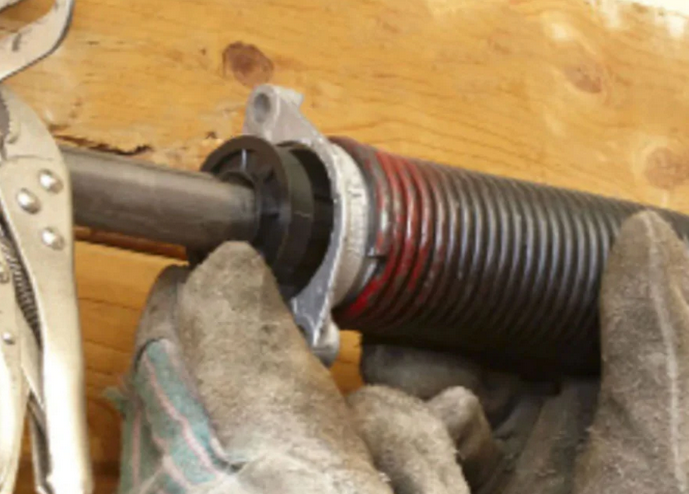
To replace a torsion spring, start by sliding the new spring onto the torsion tube with the stationary cone facing the center bracket. Then, reinstall the cable drum with the garage door wire. Finally, reinsert the torsion into the left-side bearing bracket.
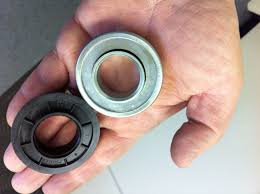
garage door center bearing
garage door center bearing

center bearing

[/dipl_how_to_schema_item][dipl_how_to_schema_item step_title=”Install the torsion bar” _builder_version=”4.20.4″ _module_preset=”default” step_heading_level=”h3″ step_heading_font=”|800|||||||” global_colors_info=”{}”]

first shove it to the left, then slide on the center bearing. Install the right spring, and then push the bearing into the stationary cone. Finally, reinstall the drum. Once the drum is in place, connect both stationary cones to the center bracket.

[/dipl_how_to_schema_item][dipl_how_to_schema_item step_title=”Run the lift cables inside the cable drum.” _builder_version=”4.20.4″ _module_preset=”default” step_heading_level=”h3″ step_heading_font=”|800|||||||” global_colors_info=”{}”]

by putting the lift cables in the cable slot until it reaches the lift cable stop point. Slide the lift cable stop through the slot on the cable drum.

[/dipl_how_to_schema_item][dipl_how_to_schema_item step_title=”Tighten the drums.” _builder_version=”4.20.4″ _module_preset=”default” step_heading_level=”h3″ step_heading_font=”|800|||||||” global_colors_info=”{}”]

use locking pliers onto the torsion tube, and rotate the drum to wind the cable into the winding grooves.
Pull the cable as tight as possible before tightening the setscrews and leave the locking pliers in place and repeat the tightening procedure on the other side. equal tension on both sides is required so that the door opens evenly.

[/dipl_how_to_schema_item][dipl_how_to_schema_item step_title=”Start winding the spring toward the ceiling” _builder_version=”4.20.4″ _module_preset=”default” step_heading_level=”h3″ step_heading_font=”|800|||||||” global_colors_info=”{}”]

by the wind bars the regular recommendation is to do 30-quarter turns for a 7-foot tall garage door or 36-quarter turns for an 8-foot tall garage door. Before tightening the setscrews, tap the winding bar to expand the spring out from the center about 1/4 inch. Rotate the setscrews until they come into contact with the torsion tube. Then turn the screws one-half to three-quarters turn tighter.

[/dipl_how_to_schema_item][dipl_how_to_schema_item step_title=”The Last Step Is to Lubricate the spring” _builder_version=”4.20.4″ _module_preset=”default” step_heading_level=”h3″ step_heading_font=”|800|||||||” global_colors_info=”{}”]

Lubrication is really important for your garage door metal parts. In general, the best option is to lubricate your garage door with PTEF lubrication because it dry fast and doesn’t attracts dirt. perfect if you living in a dusty or tropical area or if your garage is your workplace.

Silicone-based lubrication or lithium-based lubrication is recommended for long-lasting lubrication and rust protection.

Some people use WD-40 but it’s not the best practice because WD-40 Is a degreaser that in fact works as a lubrication cleaner, Instead Use WD-40 Specialist.

Read this article for more information on the best garage door lubrication products.

Finally, lubricate all the hinges in your garage door and clean all the rollers at the edge of the door then lubricate them as well.

Don’t Lubricate plastic parts with lubrication that is not indicate it’s safe for plastic and rubbers. Super slick slick stuff Lubrication is recommended.

[/dipl_how_to_schema_item][dipl_how_to_schema_item step_title=”How Replace Extension Springs” _builder_version=”4.20.4″ _module_preset=”default” step_heading_level=”h2″ step_heading_font=”|800|||||||” global_colors_info=”{}”]

Replacing extension springs is easier than torsion springs but can be a challenging task, especially if you are not familiar with the process. Here are the steps you can follow to replace extension springs:

[/dipl_how_to_schema_item][dipl_how_to_schema_item step_title=”Open Your Garage Door” _builder_version=”4.20.4″ _module_preset=”default” step_heading_level=”h3″ step_heading_font=”|800|||||||” global_colors_info=”{}”]

Open your garage door to rest it on the stepladder.

[/dipl_how_to_schema_item][dipl_how_to_schema_item step_title=”Disconnect your garage door opener. ” _builder_version=”4.20.4″ _module_preset=”default” step_heading_level=”h3″ step_heading_font=”|800|||||||” global_colors_info=”{}”]

It’s important to disconnect your garage door opener from electricity to prevent any accidental powering of the opener while you are working on replacing your garage door springs.

[/dipl_how_to_schema_item][dipl_how_to_schema_item step_title=”Put your C-clamps on the last roller” _builder_version=”4.20.4″ _module_preset=”default” step_heading_level=”h3″ step_heading_font=”|800|||||||” global_colors_info=”{}”]

at both the left and the right side of your garage door track. Make sure you tighten your C-clamp because it will work as a safety precaution to prevent your garage door from closing.
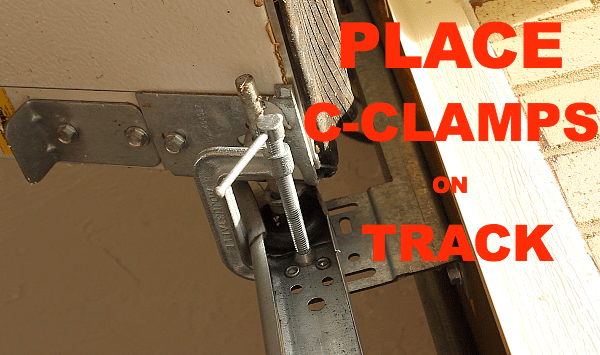
PUT THE C-CLAMPS ON THE LAST GARAGE DOOR TRACK ROLLER

[/dipl_how_to_schema_item][dipl_how_to_schema_item step_title=”Remove the attached parts to the spring” _builder_version=”4.20.4″ _module_preset=”default” step_heading_level=”h3″ step_heading_font=”|800|||||||” global_colors_info=”{}”]

Your extension spring is attracted to 3 parts ( pulley – safety cable – Eyebolt [S HOOK] ). Each part will be removed in order to remove the springs.

[/dipl_how_to_schema_item][dipl_how_to_schema_item step_title=”Remove the pulley” _builder_version=”4.20.4″ _module_preset=”default” step_heading_level=”h3″ step_heading_font=”|800|||||||” global_colors_info=”{}”]

The extension spring is attached to the pulley so you first need to remove that pulley by using the crescent wrench to loosen the bolt on the pulley. Make sure to retain the pulley orientation to make sure which way to pull it back up and attach it to your new extension springs.
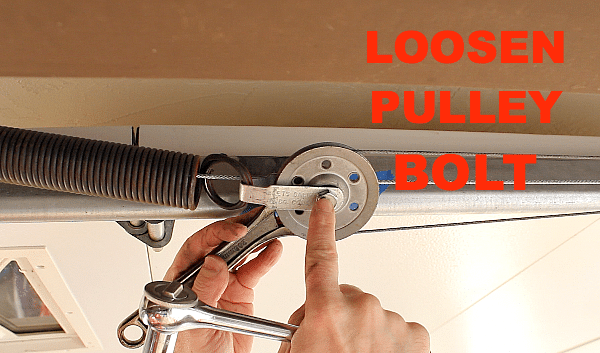
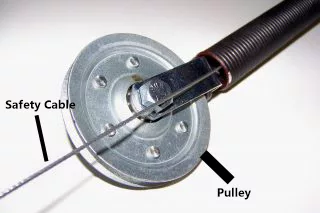
Loosen-Pulley-Bolt

safety cable & pulley

credit: garagedoorstuff


[/dipl_how_to_schema_item][dipl_how_to_schema_item step_title=”Remove the safety cable clamp.” _builder_version=”4.20.4″ _module_preset=”default” step_heading_level=”h3″ step_heading_font=”|800|||||||” global_colors_info=”{}”]

Remove the safety cable clamp in order to untie the steel safety cable.
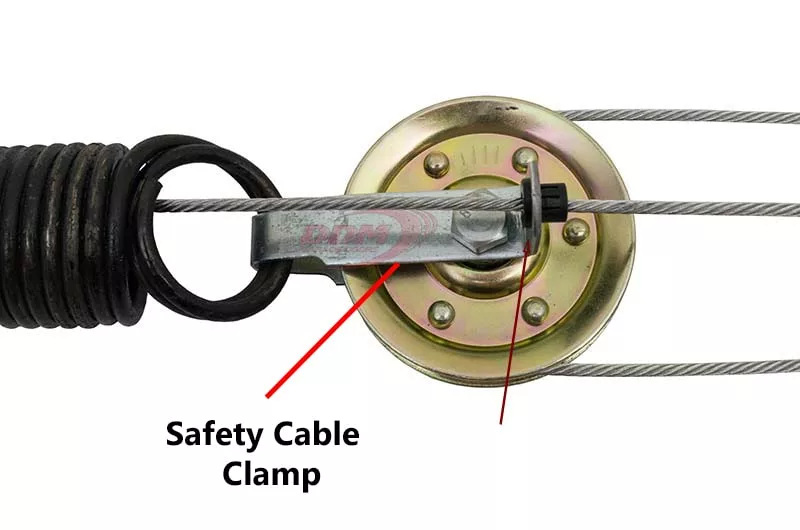
safety cable clamp

[/dipl_how_to_schema_item][dipl_how_to_schema_item step_title=”Untie the steel safety cable” _builder_version=”4.20.4″ _module_preset=”default” step_heading_level=”h3″ step_heading_font=”|800|||||||” global_colors_info=”{}”]

The safety cable is passing through the extension spring and is attached to a bracket that usually comes off your ceiling. Now Untie the safety cable and remove it from the pulley. Always remember to not make your safety cable unwound or check if it’s already unwounded or damaged and needs to be replaced too.

[/dipl_how_to_schema_item][dipl_how_to_schema_item step_title=”Remove the spring from the Eyebolt” _builder_version=”4.20.4″ _module_preset=”default” step_heading_level=”h3″ step_heading_font=”|800|||||||” global_colors_info=”{}”]

Your old spring is almost removed. After you untied the safety cable and pulled it out through the extension spring, you should see that it’s just hanging from that eye bolt and now you can remove the spring from the eyebolt.
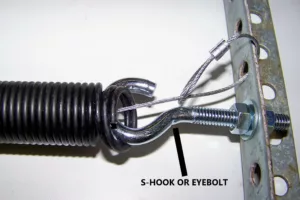
Eyebolt (S-Hook)

[/dipl_how_to_schema_item][dipl_how_to_schema_item step_title=”Put your new extension spring un-colored end to the Eyebolt” _builder_version=”4.20.4″ _module_preset=”default” step_heading_level=”h3″ step_heading_font=”|800|||||||” global_colors_info=”{}”]

Hook the uncolored end of the new extension spring onto the eyebolt and then stretch the spring to attach the colored end to the pulley system.

[/dipl_how_to_schema_item][dipl_how_to_schema_item step_title=”Put the safety cable clamp back & Slide the safety cable” _builder_version=”4.20.4″ _module_preset=”default” step_heading_level=”h3″ step_heading_font=”|800|||||||” global_colors_info=”{}”]

To reattach the safety cable clamp, first, slide the cable through the center of the clamp and then position the clamp on the end of the extension spring. Use pliers to tighten the clamp onto the spring, making sure it is securely attached. Finally, wrap the safety cable around the securing bolt or eyebolt and use pliers to tighten it into place.

[/dipl_how_to_schema_item][dipl_how_to_schema_item step_title=”Slide the pulley back in it’s place” _builder_version=”4.20.4″ _module_preset=”default” step_heading_level=”h3″ step_heading_font=”|800|||||||” global_colors_info=”{}”]

Slide the pulley back in its place in the safety cable clamp and tighten up the nut and bolt. Your pulley wheel & steel cable in the pulley should be on the right side of your safety cable.

[/dipl_how_to_schema_item][dipl_how_to_schema_item step_title=”Your new extension springs installed” _builder_version=”4.20.4″ _module_preset=”default” step_heading_level=”h3″ step_heading_font=”|800|||||||” global_colors_info=”{}”]

Now after you finished replacing your new extension springs it’s time to re-attach your garage door to the opener & remove your C-clamps and take your ladder then plug your opener back into electricity.

[/dipl_how_to_schema_item][/dipl_how_to_schema]

How to prevent broken springs in your garage door?

The experience of replacing your garage door spring is really frustrating and annoying and has a high possibility of error, that’s why you have to think about how to prevent such problems from happening. Some of our Recommendations will be useful for you

1- Maintenance is the key. Your garage door is just like anything in your life you have to keep your garage door under a regular maintenance schedule. That will prevent you from a lot of unexpected problems and fix them even before it happens. here is a blog post to help you in the Maintenance Of Your Garage Door.

2- Keep Your ears/eyes open. In your daily use of your garage door if you notice any unknown sounds or even movement don’t ignore it that else prevents you from having sudden problems.

3- Update your garage door. Maybe it will sound like an advertisement but believe me, your garage door is no different than your smartphone or any other tech you use. In fact, modern garage doors and openers are using advanced technologies that make everything way easier for everyone and advance the durability of your garage door.

4- Accidentally crash. Always be careful when you use your garage door. When a car pulls up to your garage door, it can sometimes throw the door out of alignment or even break your spring due to the higher pressure that happened.

Garage Door Springs Replacement Service Near You

Don’t risk it let the expert handle this for you. You can Hire AAA GARAGE DOOR INC in Miami-Dade or Broward Counties, We finished more than 60,000 jobs since 2010. We offer Garage door installation, maintenance, repair, and parts replacement services to our clients. Call Us 305-702-0113

Qualified Experts

Workmanship & Parts Warrantied

Service On Your Schedule

Aaa garage door inc bbb rating

Full Service garage doors, gates & openers shop

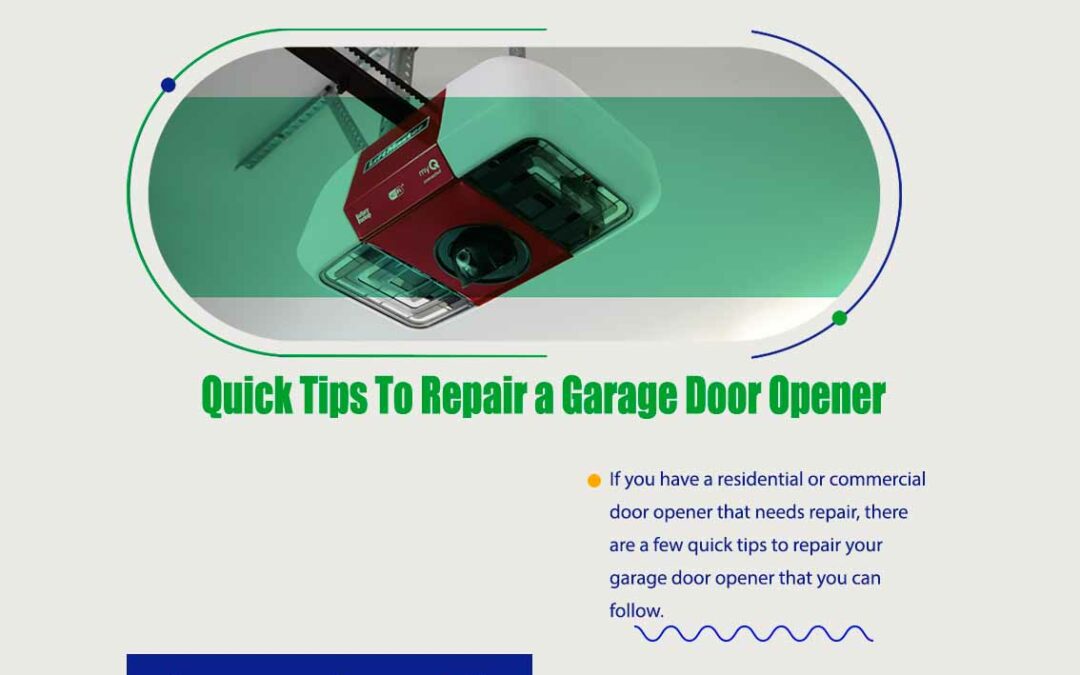
How to repair common Garage Door Opener issues

How to repair common Garage Door Opener issues

If you have a residential or commercial garage door opener, here are a few quick tips to repair the most common garage door opener issues.

First, check to ensure the power is turned on and the door opener is plugged into an outlet.,

check to make sure that the power is turned on and that the door opener is plugged into an outlet. If it is, then check to see if the door opener itself is working by pressing the button on the unit. If it does not work, then you may need to replace the batteries.

If the door opener still does not work,  you will need to open up the unit to check the wiring. Unplug the door opener from the power outlet. Then, remove the cover of the unit to access the wiring. Once you have access to the wiring, check to see if there are any loose or damaged wires. If you find any, then you will need to repair or replace them.

BE CAREFUL ( Do not unplug or plug to any source of power or any of the wires and just visually inspect the opener. It could be harmful and cause an electronic shock if you did any wrong wiring or even touched an uncovered part of the Opener ).

Once you have checked the wiring, replace the cover of the unit and plug it back into the power outlet. Press the button on the unit to see if it is now working. If it is, then you have successfully repaired your commercial door opener. if still, your opener didn’t work you should call an expert worker.


We can do the work for you Call Us at (305) 702-0113 We serve in Miami Dade & Broward County Florida.

Common Garage Door Opener Issues

Garage door repair is a process that is relatively straightforward, however, there are a few things that you need to check that would make the entire process smoother. We have listed some of the common issues that you may face, and how you can solve them.

1- Wall button not working

it’s common for the wall button to not work after a while due to a malfunction in the electrical circuit or circuit breaker, don’t worry wall button is replaceable and it is easy to install so if you found your wall button is not responding or not powering up so it’s probably the problem is from your wall button and not your opener itself.

2- The opener doesn’t stop running after your garage door is completely open

If your garage door opener doesn’t stop running after your garage door is completely open, there are a few possible causes. First, check to see if the travel limit switch needs to be adjusted. This switch tells the opener when to stop running, so if it’s not properly adjusted, the opener will keep running.
Second, check the force setting. This setting determines how much force is required to open the door, and if it’s set too low, the opener will keep running. Finally, check the garage door itself to make sure it’s not binding on the tracks. If the door is binding, the opener will keep running in an attempt to open the door.

You May Like: Basic Garage Door Maintenance Recommendations

But in general, there are two main signs that the limit switch needs adjustment first

  • Your garage door is not opening or closing fully.
  • Your garage door reverses itself after reaching the ground.

if you are experiencing one of these signs and at the same time the opener doesn’t stop running after your garage door is completely open that properly means you need to adjust the limit switch.

3- Your garage door reverses itself after reaching the ground

One of the most common problems is when you are closing your garage door even open it reverses back. this problem could be because of many reasons

  • The threshold May Be Blocked
    The garage door may not be opening because there is something blocking the threshold. This can be things like leaves, snow, or other materials. If the garage door is obstructed by a threshold, it could make the travel-down setting higher or lower than the setting it already saved.
  • Travel Down Setting Needs to be Adjusted
    If your garage door is traveling down too far, it’s likely that the travel-down setting needs to be adjusted. This setting controls how far the door will travel down when it’s opened. To adjust it, you’ll need to find the travel-down adjustment on the opener. It’s usually located on the back of the opener, near the bottom. Once you’ve found it, turn it clockwise to decrease the travel distance, or counterclockwise to increase it.
    travel down setting on garage door adjustment
  • Your Keypad Enter button is sticky
    Believe it or not, it is simple like that because if your keypad buttons are sticky, especially the enter button stuck could result in making your door keep closing after you put your passkey.
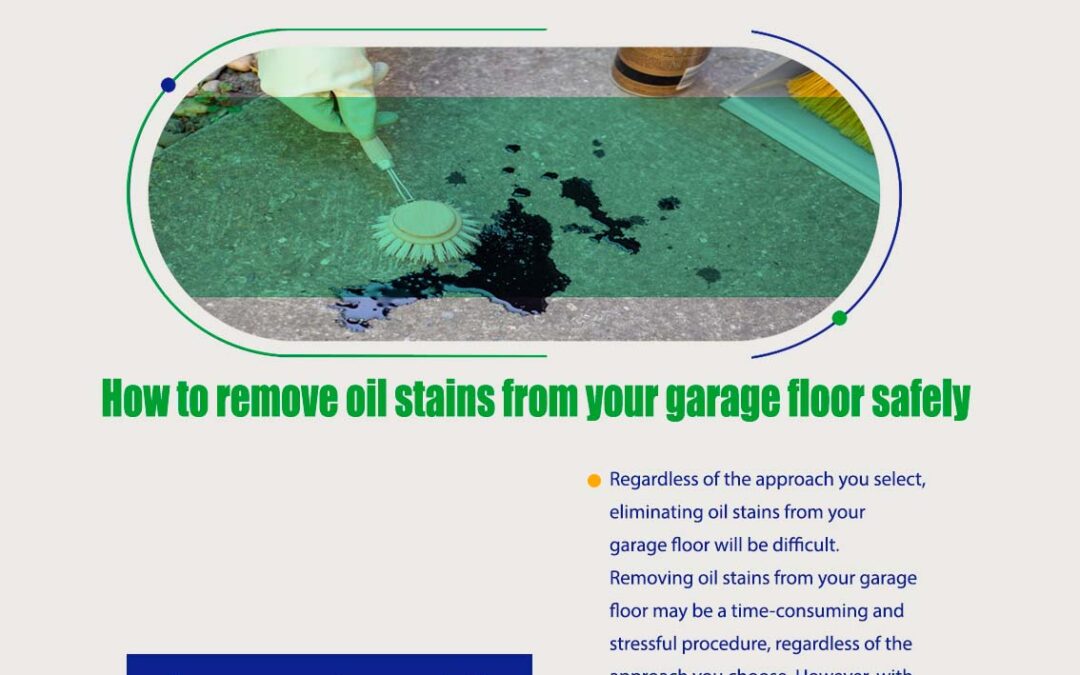
How to remove oil stains from your garage floor

How to remove oil stains from your garage floor

Oil stains on the floor are one of the most typical and aggravating issues you may have when working in your garage. These stains are not only ugly, but they may also be difficult to remove. With a little elbow grease and the correct expertise, though, you can have your garage floor looking clean and new in no time.

There are several methods for removing oil stains from your garage floor. in this article we will put these methods into 2 parts ( Safe – Partly Safe)

The Safest way to remove oil stains from your garage floor

A degreaser is one popular and safe way. These items are available at most hardware stores.

Simply apply the degreaser to the stain and scrape it with a brush.
After removing the stain, thoroughly rinse the area with clean water.

Another safe method for removing oil stains is to use a mixture of baking soda and vinegar.

Simply combine baking soda and vinegar and apply on the stain. Allow the solution to settle for a few minutes before cleaning it with a brush. Rinse the area with clean water once the stain has been cleared.

If you have a tenacious oil stain that just won’t go away, consider applying a poultice. a poultice is a deep cleaner and stain remover there are various products that Poultice cleaner for embedded oil and grease stains you should look for the products that have but you can make your homemade product.

To prepare a poultice, make a paste using equal parts flour, salt, and water.

wipe down and Brush-out your garage floor.

High-pressure air may also be useful to remove dust residues from your garage floor. ( Recommended step )

Cover the discoloration with a towel after applying the paste.

Allow the poultice to rest for at least 24 hours before removing it.

The discoloration should be gone once the poultice has been removed.

You may like: How to clean rust off the garage door

Another Partly safe Way if handled carefully to remove oil stains in return it will be more efficient.

One of these ways is to use chemicals like trisodium phosphate. Chemicals like these are used not only to clean but else to remove a layer of the basic ingredients of your garage floor that would give you the feeling it is cleaning but it simply shows you a new layer of your floor. as we always say “Safety is first you must use trisodium phosphate in caution Follow the instructions on the product, wear gloves and make sure to ventilate the garage by opening all feasible airports. It is also vital to avoid coming into touch with the product, and if this occurs, it is necessary to wash thoroughly. In terms of application, it is fairly similar to the process used to remove stains with turpentine and other materials.

Regardless of the approach, you select, removing oil stains from your garage floor will be difficult, time-consuming, and stressful, regardless of your chosen approach. However, with a little time and the appropriate information, you can restore your floor to its original state.

7 Important Garage Door Maintenance Tips

7 Important Garage Door Maintenance Tips

The garage door is an essential component of any home. If it malfunctions or breaks down, it may put a significant dent in the family budget. As a result, you must do all possible to preserve your garage door in good operating order. Here are Tips for Maintenance your Garage Door and how to keep your garage door functioning without problems, especially in harsh working conditions.

The life of such an essential component as the garage door is duly extended simply by following a basic maintenance plan, which allows the garage door opener and all of its components to perform very well and for much longer.

(Quick Tip)
Did you know that your garage door system should be maintained and tested at least once yearly to ensure that the garage door opener, springs, cables, rollers, and pulleys are in good operating status and are protected.

Basic Garage Door Maintenance Recommendations

Garage door maintenance is a simple and affordable technique to avoid wear and tear since it is essential to lubricate and balance the door once a month. Certain procedures should be taken to maintain the garage door system looking like new. The garage door’s rollers, bearings, and chains must be tested for balance and lubricated. Inspect and clean the springs, and tracks and adjust the sensitivity of the garage door opener as well. Many hire a professional for this maintenance.

Call Us For Consultation (305) 702-0113

1- Check your garage door balance

To ensure your garage door is balanced correctly, close it and pull the handle to do the manual action. Then, lift the door 3 or 4 feet off the ground; if it remains open, the door is balanced. However, if it shuts, it is important to have the assistance of an expert to guarantee its equilibrium.

2- Apply lubricant to rollers, bearings, and chains:
Maintain the garage door’s moving parts regularly using silicone lubricants or specific light oils for metal parts, with a drop on the motor of each roller as it rotates lubricating the bearings. They also lubricate the hinges and springs to keep them from jamming. Lubrication points are located where the motor and door revolve. Never remove an engine to oil its inside; they are greased from the inside to prevent dirt from entering. We recommend that you call a technician whenever you need to disassemble the engine for any reason.

3- Maintenance Springs: We strongly advised that garage owners have qualified specialists to repair or replace the springs, since they may be under great stress and cause significant damage if not handled carefully. We supply a professional to conduct the task for you in Miami and Fort Lauderdale at the most affordable pricing in the state. Call us at (305) 702-0113 for a consultation. Visually examine and clean the springs and tracks, as well as the garage door tracks and hardware, since this is a dependable approach to avoid wear and tear and spot issues early, particularly in the springs, whose endurance cannot be expected. When the springs fail, they unplug the opener and manually open the door.

4- Check the Roller: The roller is a metal or plastic cylinder that moves up and down to open and close your door. It is located at the bottom of the door, right next to the garage floor. If you notice any cracks or dents in it, it may need to be replaced.

5- Adjust the Sensitivity of Door Opener: The sensitivity of your door opener refers to how far away from the sensor your car needs to be before your garage door opens automatically. You can adjust this setting by following these steps:

  • Turn off the power first.
  • Press and hold both buttons on top of the remote for 3 seconds -Then release both buttons at once.

6- Check your garage door remote control batteries: your garage door remote batteries usually stay for more than one month but it’s okay to else check on them. If you have noticed that your remote doesn’t work as well as it used to, try changing its batteries with new ones and see if that fixes the problem.

7- Check for any signs of wear on weather seals around doors and windows to prevent water from seeping into your home through these spots.

You May Like : Problems With Garage Doors And How To Fix It

Additional tips for maintaining your garage door before the Hurricane and environmental challenges.

1- As we discussed how essential lubrication is for your garage door. Another key feature in inspecting your garage door yearly is that your garage door gears lubrication may lose its functions after extremely low temperatures or in very hot temperatures. As a result, if you hear any unexpected sounds while your garage door shuts or opens, we recommend physically inspecting the garage door lubricant and replacing it if necessary. Call a professional to properly lubricate your garage door.

2- It is critical to prepare your garage door for a hurricane. Based on our review of customer problems, we discovered that the most common problem is either broken glass. if the garage door has decorative glass windows or a broken garage door panel due to not covering the garage door with door braces. So the very first thing you must do is

  • Garage Door Braces should be used to support your garage door.
  • Shutters should be used to cover any glass decorative windows.

Hopefully, you have found this blog on garage door maintenance to be both interesting and helpful. It is important to have a garage door that is properly maintained so that it will function properly through the years. If you have any questions or concerns about the garage door maintenance process or the products that we have discussed here, please don’t hesitate to contact us at (305) 702-0113. Thank you for reading, we are always excited when one of our posts can provide useful information on a topic like this.

aaa garage doors