


An old garage door spring can be a nuisance, especially if broken. It can affect the quality of your garage door’s movement and make your garage door difficult to open and close or really dangerous because If a spring breaks, the garage door can crash down.
Revamp your garage door with ease! Follow our expert guide to replace garage door springs whether it’s an extension or torsion springs
Signs Of A Broken Garage Door Spring
Several signs indicate your garage door spring may be broken.
1- If your door is suddenly very heavy or difficult to open, this may be a sign that the springs are damaged.
2- If the door opens or closes unevenly, or seems to be off-balance, this is another potential sign of spring damage.
3- If you hear a loud noise whenever you open or close the door, this may be caused by a broken spring.
4- If your door is no longer able to open or close completely, this is a definite sign that one or more of your springs are broken and need to be replaced.
5- If your extension springs coils are extended and irregular.
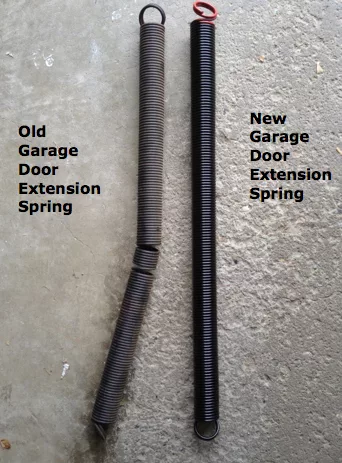
New Vs Worn out extension springs
Let me be honest with you if you do not have the expertise to deal with these problems or even notice either of these signs, it’s important to call a professional to fix the problem. Ignoring it could result in further damage to your garage door or even injury if it breaks because springs are under tremendous tension.
if you detected one of these signs that we mentioned above you must start thinking about replacing your garage door spring because ignoring the issue will make everything more complicated and potentially harmful to you or your property. So these steps are mandentory for you on how to do it by yourself.
1- Know the strengths of your garage door spring
Garage door torsion & extension springs come in a variety of strengths and picking the right one depends on the weight of your door, the old spring diameter, the inside diameter & spring type.
Generally, they’re color-coded is the easiest identification to know your garage door spring strength. here you can see we have 10 springs color codes. Remember that this way of identification is not the most accurate way and you will probably have errors in your measurements of your spring strength.
As experts, we always use the 20 coils measurements method while measuring the torsion spring diameter, which is listed below in Replace Torsion Spring section step 4 – point 6 or you can read our article about how to choose your garage door springs. which is important if you are planning to else buy replacement springs.
We won’t encourage you to do any replacements for your garage door springs by yourself, as we always mention that springs are not meant to be a DIY project because it could be dangerous and cause harm to your property or yourself if you do not have the proper knowledge of the dynamics of garage door systems.
Our experts are Trained and Licensed to do the job right for you and many others. Don’t hesitate to call us for a consultation for your garage door repairs at 305-702-0113. we serving Miami-Dade & Broward Counties Since 2009. With Over 300 Reviews & 60,000 Finished Jobs.
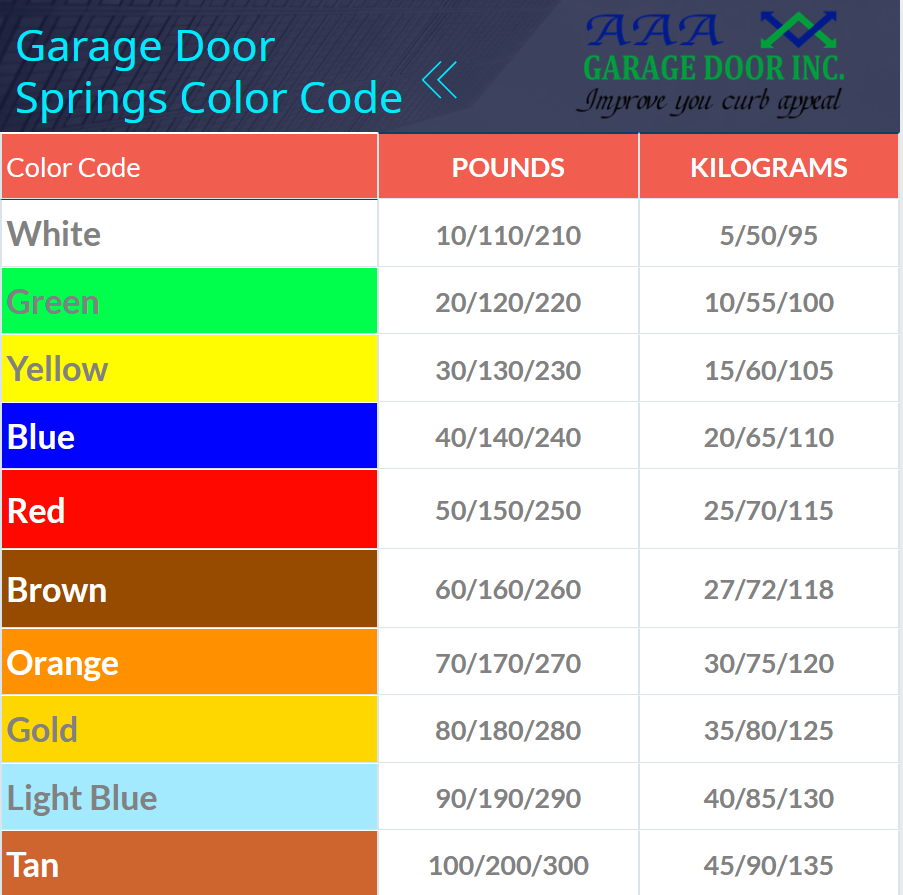
Garage Door Extension Spring Color Code
The ends of each spring are colored white for the lightest and Tan for the heaviest some other companies use blue for both their 90-pound and 140-pound Springs. If your existing Springs are blue it’s a good idea to double-check either your door weight. take a look at your existing Springs if they are color-coded make sure you replace them with Springs of the same color.
2- Know the different types of garage door springs
Knowing your garage door spring type is important to get the right replacement. There are two types of garage door springs Torsion springs and extension springs.
- Torsion springs are located above the door.
- Extension springs are located on either side of the door.
Both types of springs are important in the operation of your garage door. Torsion springs provide the power to open and close your garage door.
They are wound tightly and when released, unwind and provide the force needed to lift the door. Extension springs provide balance and support as the door opens and closes.
They help to counterbalance the weight of the door and keep it from slamming shut. It is important to know which type of spring your garage door is to ensure that it is repaired or replaced properly.
A qualified garage door technician will be able to determine which type of spring your door has and make the necessary repairs.
We Are providing a professional expert to handle these problems for you we are serving Miami-Dade and Broward Counties For over 14 years of expertise in all garage door services. Call Us For Consultation at 305-702-0113.
Types Of Torsion Springs
- Standard torsion springs are most commonly found on residential garage doors – usually, only one spring is needed for effective operation on lighter doors.
- Early-set torsion springs are similar to standard torsion springs, except that they are mounted in the middle of the torsion shaft and they are one of the safest springs because are situated inside the shaft.
- Steel rolling-door torsion springs are more likely to be seen in commercial and industrial buildings. It’s like any other spring but These springs are contained within the torsion barrel.
- Torque-master torsion springs are spring systems developed by Wayne Dalton garage doors they are enclosed in the torsion shaft and held in place by a winding cone at the end of each torsion rod.
Types of Extension Springs
- Open-looped extension springs are the weakest style of extension spring and rely on one open wire at the end.
- Double-looped extension springs are stronger than open-looped, featuring two coils at the end of the spring connect next to the pulley and eyebolt.
- Clipped-end extension springs this kind of extension springs are the best option, they tend to last longer and are frequently used on garage doors that weigh more than 200 lbs.
Most torsion springs last for 10,000 cycles which will be 6 to 7 years for avrage home owner using a his garage door for 3 to 4 time every day so your garage door torsion spring probebly will be needed to be replaced after 6 years of installation.
[/dipl_how_to_schema_item][dipl_how_to_schema_item step_title=”Safety first: Lock down the door” _builder_version=”4.20.4″ _module_preset=”default” step_heading_level=”h3″ step_heading_font=”|800|||||||” global_colors_info=”{}”]
Before beginning any garage door parts replacement or repair, be sure to unplug the garage door opener to avoid any injuries And Keep the garage door closed while replacing torsion springs.
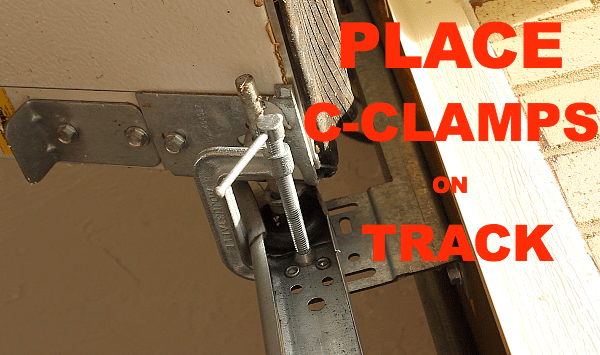
Find the wheel attached to your garage door that travels in the track.Then, tighten the C clamp in the track directly above the wheel.
This will prevent further accidents from happening.
Screwdrivers, pin punches, and pliers handles should never be used to wind or unwind a torsion spring.
If you’re thinking about doing this job without a proper set of winding bars, just don’t!.
Professional winding bars work with 1/2-inch. and 7/16-in. winding cones.Unplug your garage door opener before beginning this project, and be sure to keep it unplugged throughout.
Once you’ve disconnected the opener, lower your garage door and lock it into place.
This is especially important if you’re going to be replacing your garage door springs, as they can be dangerous. Wear eye protection and gloves while working on your garage door.
Once you’re ready to test the balance of your door, step off the ladder and move it out of the way. Never test a door while you’re still on the ladder – it’s dangerous.

[/dipl_how_to_schema_item][dipl_how_to_schema_item step_title=”Use The Winding Bar” _builder_version=”4.20.4″ _module_preset=”default” step_heading_level=”h3″ step_heading_font=”|800|||||||” global_colors_info=”{}”]
In order to loosen the unbroken spring, use the winding bar.Look for the bottom hole of the winding cone of the good spring and shove the winding bar inside.Once the bar is in place, hold it while loosening the two setscrews. Be careful – when you release the setscrews, the spring will try to push with a lot of force.
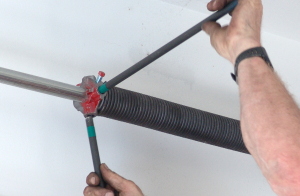
winding bar garage door spring
[/dipl_how_to_schema_item][dipl_how_to_schema_item step_title=”Remove the springs, cables, and cable drums” _builder_version=”4.20.4″ _module_preset=”default” step_heading_level=”h3″ step_heading_font=”|800|||||||” global_colors_info=”{}”]
To insert the second winding bar, insert it into the hole at the 9:00 position.
Remove the bottom bar and unwind the spring a quarter turn at a time. As you unwind, make sure to switch between the winding bars.
[/dipl_how_to_schema_item][dipl_how_to_schema_item step_title=”Use C-clamp to Secure the torsion tube.” _builder_version=”4.20.4″ _module_preset=”default” step_heading_level=”h3″ step_heading_font=”|800|||||||” global_colors_info=”{}”]
You will need to snap a C-clamp onto the center bracket in order to hold the torsion tube securely in place within the bracket.
Next, loosen the setscrews on both the left and right lift cable drums before disconnecting the lift cables from each drum.
[/dipl_how_to_schema_item][dipl_how_to_schema_item step_title=”Remove the springs from the bracket.” _builder_version=”4.20.4″ _module_preset=”default” step_heading_level=”h3″ step_heading_font=”|800|||||||” global_colors_info=”{}”]
first, disconnect them from the stationary spring cones. Then remove the two nuts and bolts that fasten the spring cones to the center bracket. Finally, slide the springs toward the end brackets.
[/dipl_how_to_schema_item][dipl_how_to_schema_item step_title=”Replacement Spring” _builder_version=”4.20.4″ _module_preset=”default” step_heading_level=”h3″ step_heading_font=”|800|||||||” global_colors_info=”{}”]
- there are a few pieces of information you have to know about the garage door spring ( The Spring wire diameter – The Inside Wire diameter – For Torsion spring Length is needed – Left or right-hand Wind Spring ).
Calculate the wire diameter
To calculate the wire diameter of the garage door spring, you will need to have a calculator and tape measure then use the 20 coils measurements method. For example, if you have a spring Count of 20 coils and the length of these 20 Coils is 5 inches then you can calculate the wire diameter by dividing 5 inches by 20. So in this case, the wire diameter would be 250.Another example: is if the coils measure 6.44 inches, the wire diameter would be 20/6.44 = 322. As you can see, even a small difference in coil size can make a big difference in the wire diameter. That’s why it’s important to be precise when measuring coils.A good way to confirm your wire diameter measurement is to count the number of coils and then divide it by 40. This way, you’re double-checking your work and eliminating any potential errors.The Spring color code systems we listed above can also be used to figure out wire diameter measurements, though it’s important to note that there are two different code systems in use and one of them is not very accurate anymore.
The Inside Wire Diameter To Know the inside wire diameter you will find them written on the winding cones of the spring.
Torsion spring Length: On your broken spring you will take the measurement of the first piece then you will measure the second one and add both measurements together to get the length of the spring.Tips: If you measure 3/4 of an inch longer or shorter it won’t make any difference to your garage door balance, but do not add the size of the winding cones of the spring that’s would make a lot more different and may result in throwing off your garage door from the track.Left or right-hand Spring: Simply look in the direction of the spring and see does the spring start clockwise or counterclockwise if it’s clockwise so it’s a right-hand spring and if it’s counterclockwise so it’s a left-hand spring.
[/dipl_how_to_schema_item][dipl_how_to_schema_item step_title=”Replace the torsion spring” _builder_version=”4.20.4″ _module_preset=”default” step_heading_level=”h3″ step_heading_font=”|800|||||||” global_colors_info=”{}”]
To replace a torsion spring, start by sliding the new spring onto the torsion tube with the stationary cone facing the center bracket. Then, reinstall the cable drum with the garage door wire. Finally, reinsert the torsion into the left-side bearing bracket.
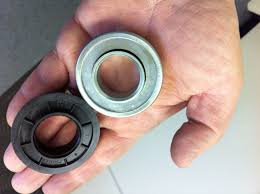
garage door center bearing
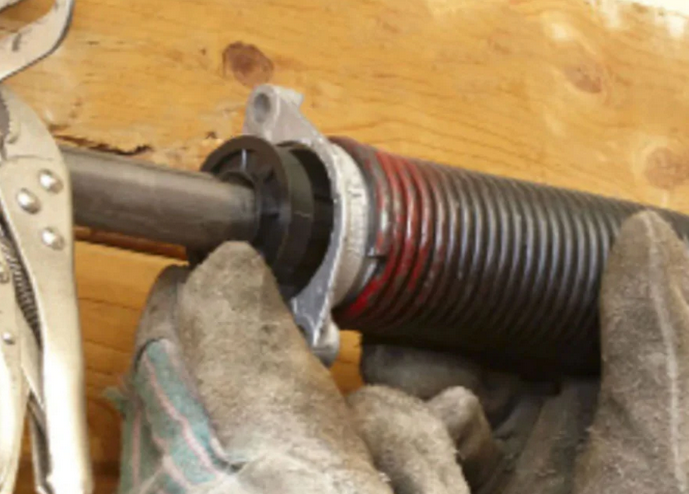
[/dipl_how_to_schema_item][dipl_how_to_schema_item step_title=”Install the torsion bar” _builder_version=”4.20.4″ _module_preset=”default” step_heading_level=”h3″ step_heading_font=”|800|||||||” global_colors_info=”{}”]
first shove it to the left, then slide on the center bearing. Install the right spring, and then push the bearing into the stationary cone. Finally, reinstall the drum. Once the drum is in place, connect both stationary cones to the center bracket.
[/dipl_how_to_schema_item][dipl_how_to_schema_item step_title=”Run the lift cables inside the cable drum.” _builder_version=”4.20.4″ _module_preset=”default” step_heading_level=”h3″ step_heading_font=”|800|||||||” global_colors_info=”{}”]
by putting the lift cables in the cable slot until it reaches the lift cable stop point. Slide the lift cable stop through the slot on the cable drum.
[/dipl_how_to_schema_item][dipl_how_to_schema_item step_title=”Tighten the drums.” _builder_version=”4.20.4″ _module_preset=”default” step_heading_level=”h3″ step_heading_font=”|800|||||||” global_colors_info=”{}”]
use locking pliers onto the torsion tube, and rotate the drum to wind the cable into the winding grooves.
Pull the cable as tight as possible before tightening the setscrews and leave the locking pliers in place and repeat the tightening procedure on the other side. equal tension on both sides is required so that the door opens evenly.
[/dipl_how_to_schema_item][dipl_how_to_schema_item step_title=”Start winding the spring toward the ceiling” _builder_version=”4.20.4″ _module_preset=”default” step_heading_level=”h3″ step_heading_font=”|800|||||||” global_colors_info=”{}”]
by the wind bars the regular recommendation is to do 30-quarter turns for a 7-foot tall garage door or 36-quarter turns for an 8-foot tall garage door. Before tightening the setscrews, tap the winding bar to expand the spring out from the center about 1/4 inch. Rotate the setscrews until they come into contact with the torsion tube. Then turn the screws one-half to three-quarters turn tighter.
[/dipl_how_to_schema_item][dipl_how_to_schema_item step_title=”The Last Step Is to Lubricate the spring” _builder_version=”4.20.4″ _module_preset=”default” step_heading_level=”h3″ step_heading_font=”|800|||||||” global_colors_info=”{}”]
Lubrication is really important for your garage door metal parts. In general, the best option is to lubricate your garage door with PTEF lubrication because it dry fast and doesn’t attracts dirt. perfect if you living in a dusty or tropical area or if your garage is your workplace.
Silicone-based lubrication or lithium-based lubrication is recommended for long-lasting lubrication and rust protection.
Some people use WD-40 but it’s not the best practice because WD-40 Is a degreaser that in fact works as a lubrication cleaner, Instead Use WD-40 Specialist.
Read this article for more information on the best garage door lubrication products.
Finally, lubricate all the hinges in your garage door and clean all the rollers at the edge of the door then lubricate them as well.
Don’t Lubricate plastic parts with lubrication that is not indicate it’s safe for plastic and rubbers. Super slick slick stuff Lubrication is recommended.
[/dipl_how_to_schema_item][dipl_how_to_schema_item step_title=”How Replace Extension Springs” _builder_version=”4.20.4″ _module_preset=”default” step_heading_level=”h2″ step_heading_font=”|800|||||||” global_colors_info=”{}”]
Replacing extension springs is easier than torsion springs but can be a challenging task, especially if you are not familiar with the process. Here are the steps you can follow to replace extension springs:
[/dipl_how_to_schema_item][dipl_how_to_schema_item step_title=”Open Your Garage Door” _builder_version=”4.20.4″ _module_preset=”default” step_heading_level=”h3″ step_heading_font=”|800|||||||” global_colors_info=”{}”]
Open your garage door to rest it on the stepladder.
[/dipl_how_to_schema_item][dipl_how_to_schema_item step_title=”Disconnect your garage door opener. ” _builder_version=”4.20.4″ _module_preset=”default” step_heading_level=”h3″ step_heading_font=”|800|||||||” global_colors_info=”{}”]
It’s important to disconnect your garage door opener from electricity to prevent any accidental powering of the opener while you are working on replacing your garage door springs.
[/dipl_how_to_schema_item][dipl_how_to_schema_item step_title=”Put your C-clamps on the last roller” _builder_version=”4.20.4″ _module_preset=”default” step_heading_level=”h3″ step_heading_font=”|800|||||||” global_colors_info=”{}”]
at both the left and the right side of your garage door track. Make sure you tighten your C-clamp because it will work as a safety precaution to prevent your garage door from closing.
[/dipl_how_to_schema_item][dipl_how_to_schema_item step_title=”Remove the attached parts to the spring” _builder_version=”4.20.4″ _module_preset=”default” step_heading_level=”h3″ step_heading_font=”|800|||||||” global_colors_info=”{}”]
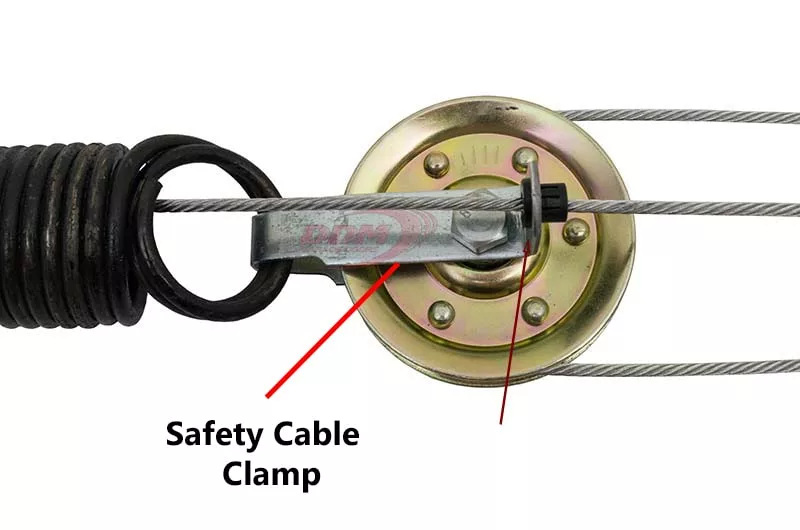
Your extension spring is attracted to 3 parts ( pulley – safety cable – Eyebolt [S HOOK] ). Each part will be removed in order to remove the springs.
[/dipl_how_to_schema_item][dipl_how_to_schema_item step_title=”Remove the pulley” _builder_version=”4.20.4″ _module_preset=”default” step_heading_level=”h3″ step_heading_font=”|800|||||||” global_colors_info=”{}”]
The extension spring is attached to the pulley so you first need to remove that pulley by using the crescent wrench to loosen the bolt on the pulley. Make sure to retain the pulley orientation to make sure which way to pull it back up and attach it to your new extension springs.
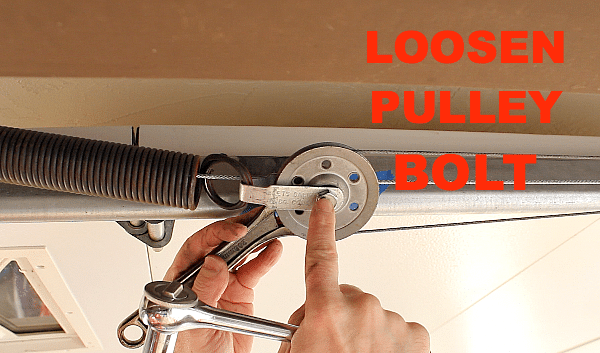

credit: garagedoorstuff
[/dipl_how_to_schema_item][dipl_how_to_schema_item step_title=”Remove the safety cable clamp.” _builder_version=”4.20.4″ _module_preset=”default” step_heading_level=”h3″ step_heading_font=”|800|||||||” global_colors_info=”{}”]
Remove the safety cable clamp in order to untie the steel safety cable.
[/dipl_how_to_schema_item][dipl_how_to_schema_item step_title=”Untie the steel safety cable” _builder_version=”4.20.4″ _module_preset=”default” step_heading_level=”h3″ step_heading_font=”|800|||||||” global_colors_info=”{}”]
The safety cable is passing through the extension spring and is attached to a bracket that usually comes off your ceiling. Now Untie the safety cable and remove it from the pulley. Always remember to not make your safety cable unwound or check if it’s already unwounded or damaged and needs to be replaced too.
[/dipl_how_to_schema_item][dipl_how_to_schema_item step_title=”Remove the spring from the Eyebolt” _builder_version=”4.20.4″ _module_preset=”default” step_heading_level=”h3″ step_heading_font=”|800|||||||” global_colors_info=”{}”]
Your old spring is almost removed. After you untied the safety cable and pulled it out through the extension spring, you should see that it’s just hanging from that eye bolt and now you can remove the spring from the eyebolt.
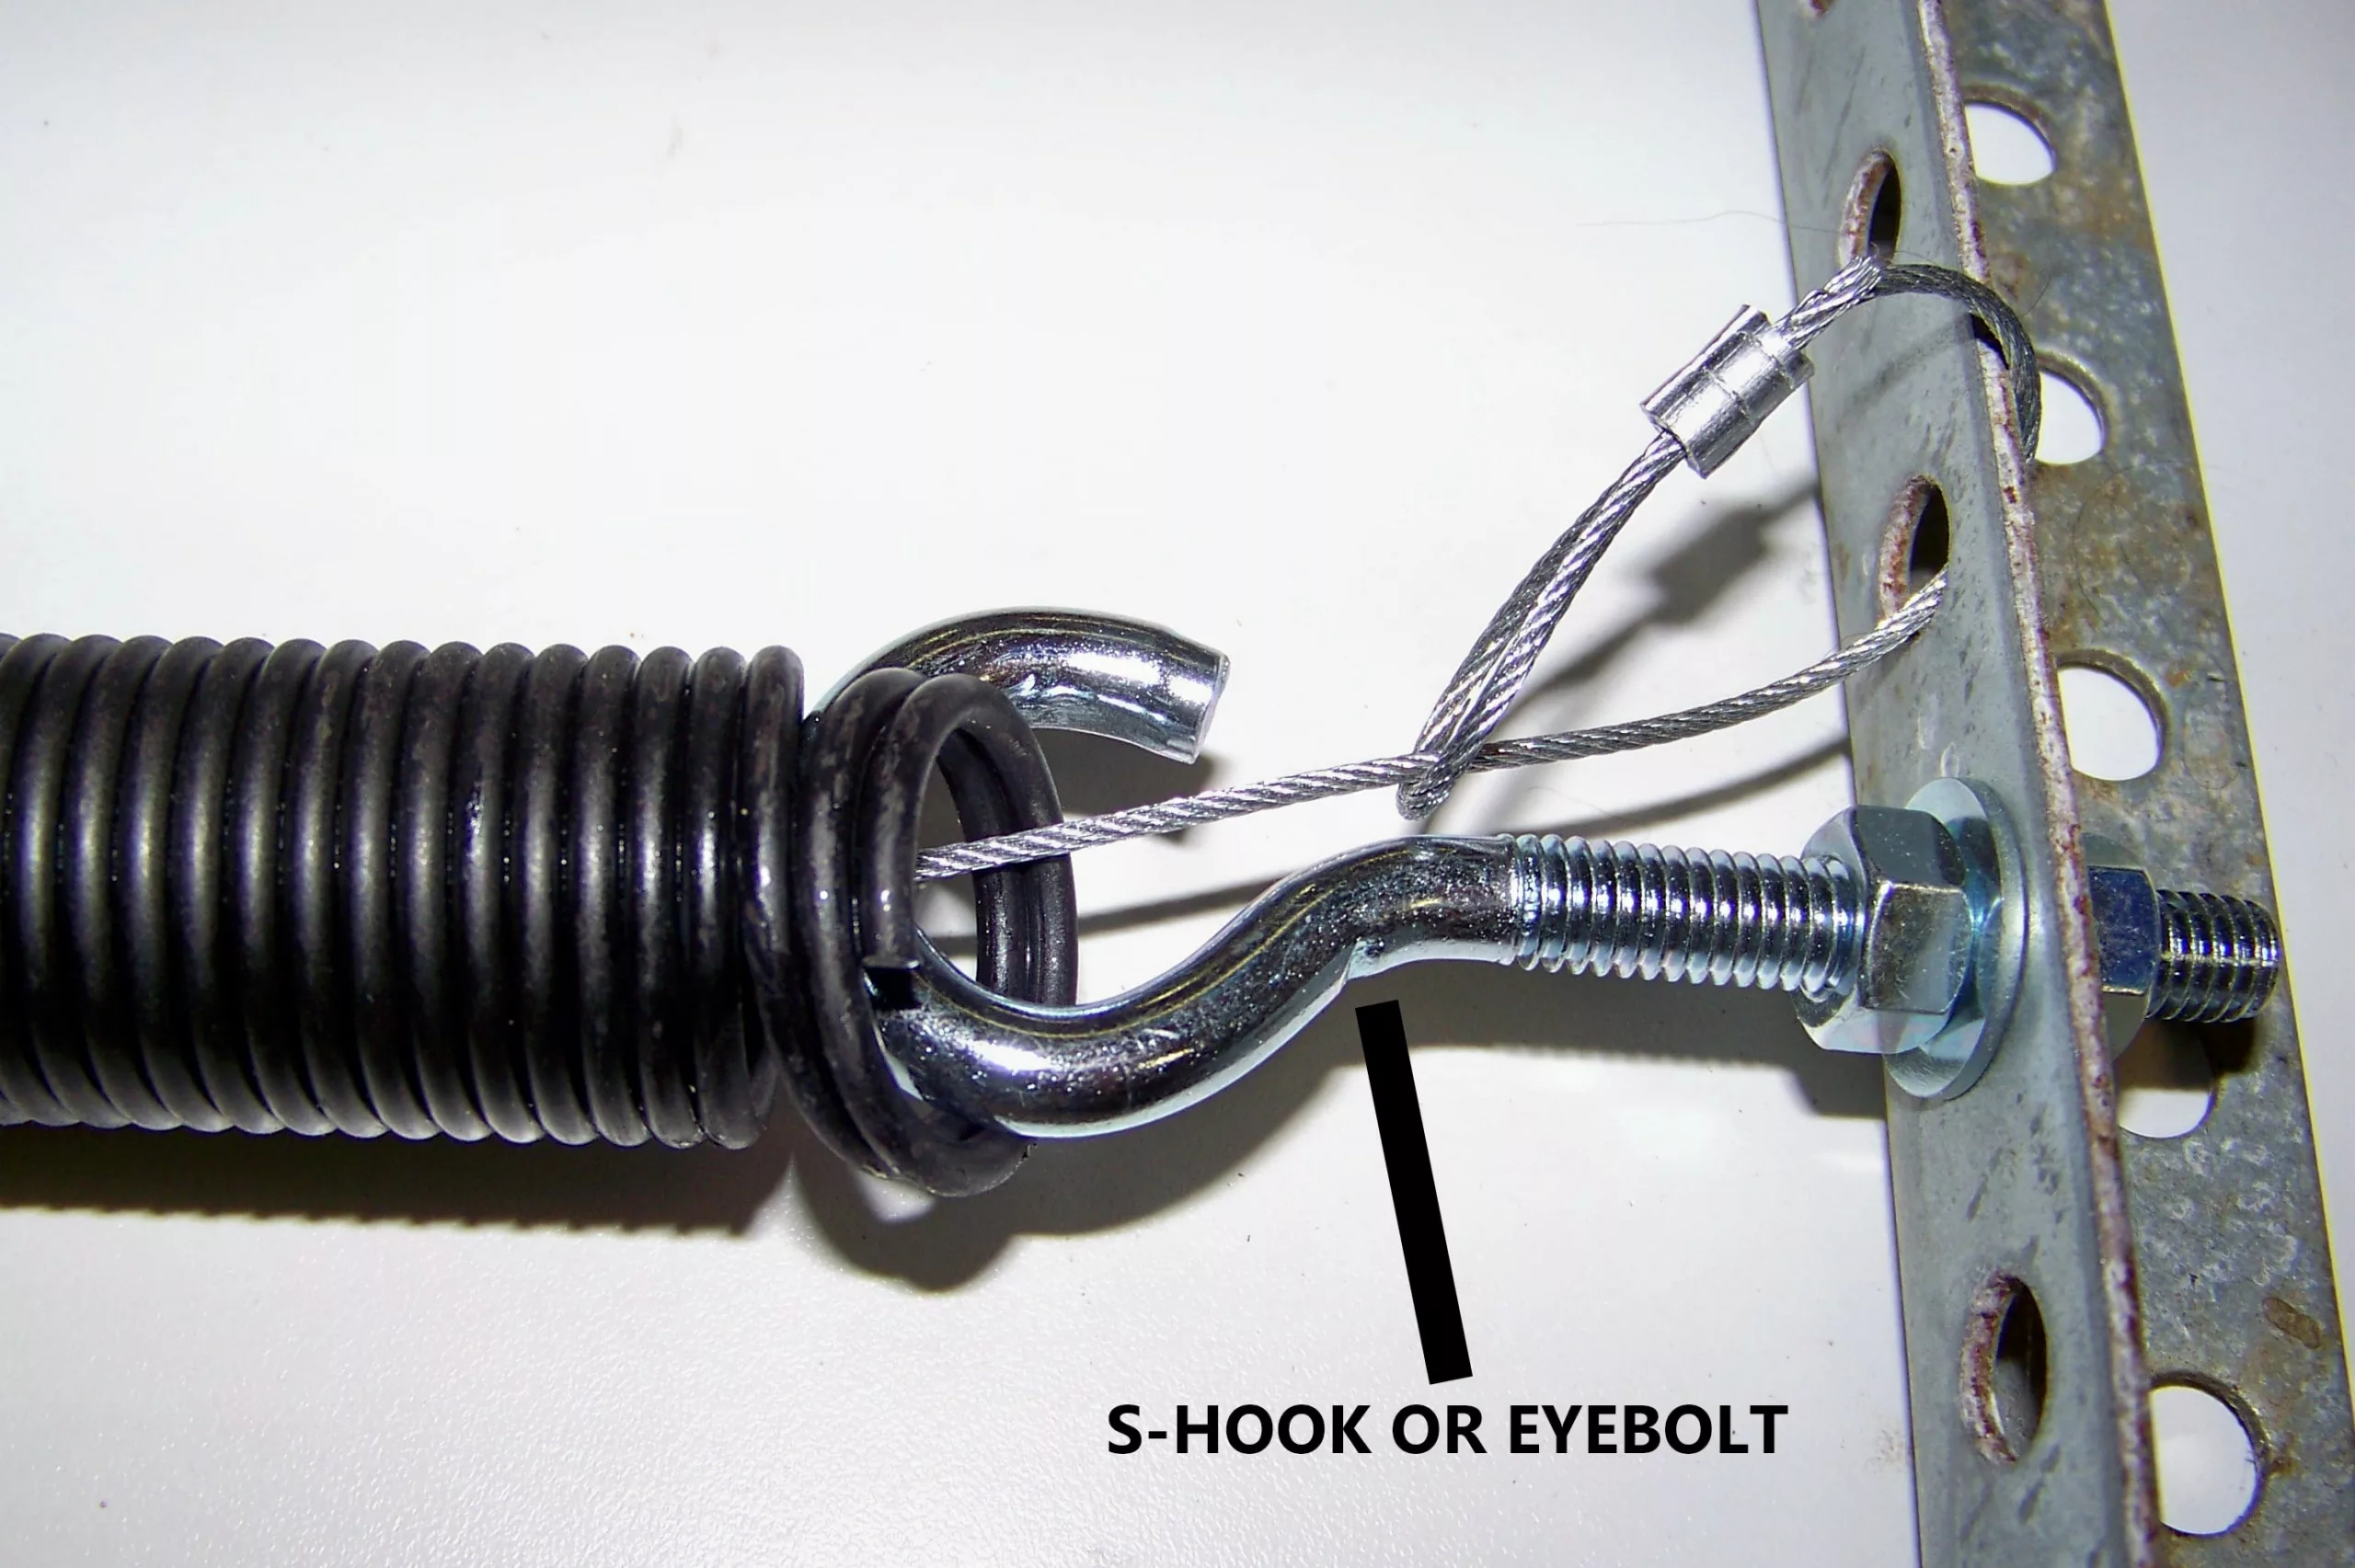
[/dipl_how_to_schema_item][dipl_how_to_schema_item step_title=”Put your new extension spring un-colored end to the Eyebolt” _builder_version=”4.20.4″ _module_preset=”default” step_heading_level=”h3″ step_heading_font=”|800|||||||” global_colors_info=”{}”]
Hook the uncolored end of the new extension spring onto the eyebolt and then stretch the spring to attach the colored end to the pulley system.
[/dipl_how_to_schema_item][dipl_how_to_schema_item step_title=”Put the safety cable clamp back & Slide the safety cable” _builder_version=”4.20.4″ _module_preset=”default” step_heading_level=”h3″ step_heading_font=”|800|||||||” global_colors_info=”{}”]
To reattach the safety cable clamp, first, slide the cable through the center of the clamp and then position the clamp on the end of the extension spring. Use pliers to tighten the clamp onto the spring, making sure it is securely attached. Finally, wrap the safety cable around the securing bolt or eyebolt and use pliers to tighten it into place.
[/dipl_how_to_schema_item][dipl_how_to_schema_item step_title=”Slide the pulley back in it’s place” _builder_version=”4.20.4″ _module_preset=”default” step_heading_level=”h3″ step_heading_font=”|800|||||||” global_colors_info=”{}”]
Slide the pulley back in its place in the safety cable clamp and tighten up the nut and bolt. Your pulley wheel & steel cable in the pulley should be on the right side of your safety cable.
[/dipl_how_to_schema_item][dipl_how_to_schema_item step_title=”Your new extension springs installed” _builder_version=”4.20.4″ _module_preset=”default” step_heading_level=”h3″ step_heading_font=”|800|||||||” global_colors_info=”{}”]
Now after you finished replacing your new extension springs it’s time to re-attach your garage door to the opener & remove your C-clamps and take your ladder then plug your opener back into electricity.
[/dipl_how_to_schema_item][/dipl_how_to_schema]
How to prevent broken springs in your garage door?
The experience of replacing your garage door spring is really frustrating and annoying and has a high possibility of error, that’s why you have to think about how to prevent such problems from happening. Some of our Recommendations will be useful for you
1- Maintenance is the key. Your garage door is just like anything in your life you have to keep your garage door under a regular maintenance schedule. That will prevent you from a lot of unexpected problems and fix them even before it happens. here is a blog post to help you in the Maintenance Of Your Garage Door.
2- Keep Your ears/eyes open. In your daily use of your garage door if you notice any unknown sounds or even movement don’t ignore it that else prevents you from having sudden problems.
3- Update your garage door. Maybe it will sound like an advertisement but believe me, your garage door is no different than your smartphone or any other tech you use. In fact, modern garage doors and openers are using advanced technologies that make everything way easier for everyone and advance the durability of your garage door.
4- Accidentally crash. Always be careful when you use your garage door. When a car pulls up to your garage door, it can sometimes throw the door out of alignment or even break your spring due to the higher pressure that happened.
Garage Door Springs Replacement Service Near You
Don’t risk it let the expert handle this for you. You can Hire AAA GARAGE DOOR INC in Miami-Dade or Broward Counties, We finished more than 60,000 jobs since 2010. We offer Garage door installation, maintenance, repair, and parts replacement services to our clients. Call Us 305-702-0113
Qualified Experts
Workmanship & Parts Warrantied
Service On Your Schedule


0 Comments